Installing Debian 12 Bookworm on Raspberry Pi 5: A Step-by-Step Guide Using the FlightRadar24 Image
Sometimes, you just want plain Debian 12 and you want it on the latest Raspberry Pi 5. This guide will walk you through the process of setting up Debian 12 on your Raspberry Pi 5 using a ready-made FlightRadar24 image, which is based on Debian Bookworm, and then optimizing the system by removing unnecessary software like FlightRadar24 and dump1090-mutability. We’ll also troubleshoot potential firmware issues, update the login message, and customize the system.
Step 0: Assemble your Raspberry Pi 5
Watch the below video if you wish to see the assembly of the Pi with Active Cooler and case
Step 1: Download the FlightRadar24 Image
Before we begin, we’ll use the FlightRadar24 image, which is already built on Debian 12 Bookworm. This image is designed for those who want to track aircraft and run a PiAware setup, but even if that’s not your goal, it’s a convenient starting point since it’s based on the latest version of Debian.
- Download the FlightRadar24 Image from FlightRadar24 Build Your Own.
- Unzip the downloaded file to prepare it for flashing onto your SD card.
Step 2: Flash the Image Using Raspberry Pi Imager
The Raspberry Pi Imager simplifies the process of flashing operating systems to SD cards. It also allows you to configure essential settings like hostname, Wi-Fi, and user credentials without manually editing files afterward.
- Download Raspberry Pi Imager from Raspberry Pi Software.
- Insert your SD card into your computer.
- Open Raspberry Pi Imager
- Select CHOOSE OS and select Use custom
- Select the FlightRadar24 image you just downloaded in Step 1
- Select the Storage and select the empty SD Card that you have attached to your computer
- Click Edit Settings when prompted to apply OS customisation settings. Here, you can:
- Set a hostname for your Raspberry Pi.
- Set up the username and password for the system.
- Configure the Wi-Fi network by adding your SSID and password.
- Enable SSH under Services tab, if you want remote access right from the start.
- Click Write to flash the image to your SD card and apply the settings.
- Once the process is complete, safely eject the SD card.
Step 3: Boot Your Raspberry Pi
- Insert the SD card into your Raspberry Pi 5 and power it on.
- The Pi might have reboot automatically more than once to initialise the username/passwords, connecting to WiFi etc.
- It will boot into the FlightRadar24 setup screen or a web-based GUI. If you’re not interested in using FlightRadar24, follow the next steps to remove this software and related services.
Step 4: Remove FlightRadar24 and Dump1090-mutability
By default, the image includes FR24Feed and dump1090-mutability, which are used for aircraft tracking. If you do not need them, you can uninstall them to free up resources.
Stop and Disable FR24Feed:
1
2
3
sudo systemctl stop fr24feed sudo systemctl disable fr24feed sudo apt-get remove --purge fr24feedStop and Disable Dump1090-mutability::
1
2
3
sudo systemctl stop dump1090-mutability sudo systemctl disable dump1090-mutability sudo apt-get remove --purge dump1090-mutabilityRemove Lighttpd:
1
2
3
sudo systemctl stop lighttpd sudo systemctl disable lighttpd sudo apt-get remove --purge lighttpdRemove fr24gui:
1
2
3
sudo systemctl stop fr24gui sudo systemctl disable fr24gui.service sudo apt-get remove --purge fr24guiValidate if there are any services that might be running related to fr24:
1sudo systemctl list-unit-files --type=serviceClean up remaining packages::
1
2
sudo apt-get autoremove --purge sudo apt-get clean
Step 5: Fixing Firmware and Boot Issues
If you encounter errors like cannot read file system information for /boot/firmware, follow these steps to resolve the issue:
Unmount and recreate the /boot/firmware directory:
1
2
sudo umount /boot sudo mkdir /boot/firmwareModify /etc/fstab to reference /boot/firmware:
1
2
3
4
sudo sed -i "s👢boot/firmware:" /etc/fstab // Note that the character after s is a colon followed by boot s(colon)boot(colon)boot/firmware:) sudo systemctl daemon-reload sudo mount /boot/firmware sudo apt -f installReload the system daemon and install any pending packages:
1
2
3
sudo systemctl daemon-reload sudo mount /boot/firmware sudo apt -f install
Step 6: Customise the message of the day (motd) [Optional]
- Create a dynamic MOTD that displays useful system information such as:
- Number of running processes.
- System uptime.
- IP addresses of connected devices.
- IP address of the Raspberry Pi.
Add the dynamic script:
1sudo nano /etc/update-motd.d/01-custom
Add the following content to the file:
| |
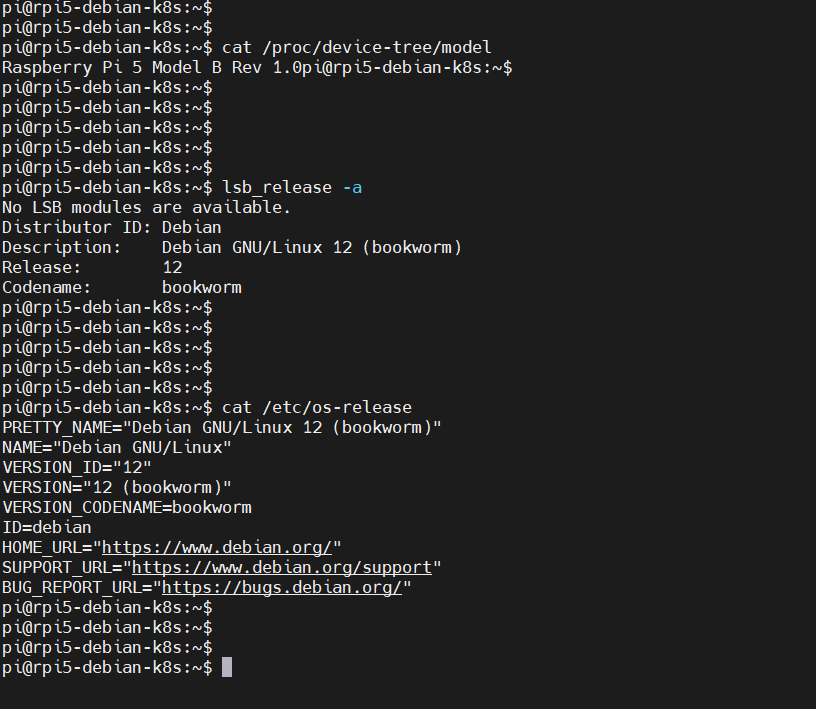
Check the Hardware and software properties
| |
Screenshot:
Conclusion
There are times when we prefer plain vanilla Debian over Ubuntu or Raspbian on a Raspberry Pi. While an official Debian image for the Raspberry Pi 5 is still in the works, this guide provides a reliable method to install Debian 12. If you have a specific reason for choosing Debian on your Raspberry Pi, feel free to share your use case in the comments below!
All the best!
Note about Installing Piaware on Raspberry Pi 5
If you want to install Flightaware’s piaware on Raspberry Pi 5, you can now do that on this image because Piaware can be installed on this Raspberry Pi 5
You wouldn’t want to uninstall dump1090-mutability and others like we did in the earlier steps.